<?xml version="1.0" encoding="utf-8"?><feed xmlns="http://www.w3.org/2005/Atom" ><generator uri="https://jekyllrb.com/" version="4.3.4">Jekyll</generator><link href="https://markoivancic.from.hr/feed.xml" rel="self" type="application/atom+xml" /><link href="https://markoivancic.from.hr/" rel="alternate" type="text/html" /><updated>2025-10-23T16:57:13+02:00</updated><id>https://markoivancic.from.hr/feed.xml</id><title type="html">Marko Ivančić | blog &amp;amp; about</title><subtitle></subtitle><entry><title type="html">OpenID4VCI Proof-of-Concept Implementation in SimpleSAMLphp</title><link href="https://markoivancic.from.hr/openid4vci-proof-of-concept-implementation-in-simplesamlphp" rel="alternate" type="text/html" title="OpenID4VCI Proof-of-Concept Implementation in SimpleSAMLphp" /><published>2025-10-23T09:36:44+02:00</published><updated>2025-10-23T09:36:44+02:00</updated><id>https://markoivancic.from.hr/openid4vci-proof-of-concept-implementation-in-simplesamlphp</id><content type="html" xml:base="https://markoivancic.from.hr/openid4vci-proof-of-concept-implementation-in-simplesamlphp"><![CDATA[<p>As part of the GEANT Trust &amp; Identity Incubator project, I had the opportunity
to implement and demonstrate proof-of-concept functionalities for the emerging
OpenID for Verifiable Credential Issuance (OpenID4VCI) specification within the
widely used SimpleSAMLphp identity framework. This work represents a meaningful
step toward enabling interoperable, standards-based credential issuance in
academic and research identity infrastructures.</p>

<p>My contribution focused on extending the <a href="https://github.com/simplesamlphp/simplesamlphp-module-oidc/"><code class="language-plaintext highlighter-rouge">oidc</code></a>
module in SimpleSAMLphp to support credential issuance flows compliant
with OpenID4VCI draft 15. The goal was to create a lightweight,
standards-aligned issuer that could be easily adopted by identity providers
(IdPs) in federated environments.</p>

<p>To validate the implementation, I demonstrated credential issuance using three
different wallets:</p>
<ul>
  <li>Sphereon Wallet</li>
  <li>Lissi Wallet</li>
  <li>Data Wallet</li>
</ul>

<p>Since the specification is still in draft phase, each wallet had different
capabilities compatible with different specification draft, with an overview of
the supported features below.</p>

<p><img src="/assets/images/posts/2025-10-23-openid4vci-proof-of-concept-implementation-in-simplesamlphp/img.jpeg" alt="Img" /></p>

<p>By embedding OpenID4VCI into SimpleSAMLphp, we enable existing IdPs to act as
credential issuers with minimal disruption, paving the way for:</p>
<ul>
  <li>User-centric credential management in academic and research settings</li>
  <li>Cross-wallet compatibility through standards-based issuance</li>
  <li>Future integration with OpenID4VP for selective disclosure and verification</li>
</ul>

<p>Since this is “just” a proof-of-concept, I’m happy to share the code and
documentation with anyone interested in exploring the implementation. However,
please note that this is not a production-ready solution.</p>

<p>My next milestone is to implement OpenID4VP support in SimpleSAMLphp,
enabling full issuer–holder–verifier flows. This will allow verifiable
credentials issued via OpenID4VCI to be presented and verified using
OpenID4VP protocols, completing the trust triangle.</p>]]></content><author><name>cicnavi</name></author><category term="Programming" /><summary type="html"><![CDATA[As part of the GEANT Trust &amp; Identity Incubator project, I had the opportunity to implement and demonstrate proof-of-concept functionalities for the emerging OpenID for Verifiable Credential Issuance (OpenID4VCI) specification within the widely used SimpleSAMLphp identity framework. This work represents a meaningful step toward enabling interoperable, standards-based credential issuance in academic and research identity infrastructures.]]></summary></entry><entry><title type="html">Automatic ssh-agent Activation When Opening bash</title><link href="https://markoivancic.from.hr/automatic-ssh-agent-activation-when-opening-bash" rel="alternate" type="text/html" title="Automatic ssh-agent Activation When Opening bash" /><published>2025-01-20T08:36:44+01:00</published><updated>2025-01-20T08:36:44+01:00</updated><id>https://markoivancic.from.hr/automatic-ssh-agent-activation-when-opening-bash</id><content type="html" xml:base="https://markoivancic.from.hr/automatic-ssh-agent-activation-when-opening-bash"><![CDATA[<h1 id="automatic-ssh-agent-activation-when-opening-bash">Automatic ssh-agent Activation When Opening bash</h1>

<p>If you frequently use SSH for tasks like connecting to remote servers or pushing code to Git repositories, you’ve
likely encountered the need to manage your private keys. One of the most convenient ways to streamline your workflow
is by automating the activation of <code class="language-plaintext highlighter-rouge">ssh-agent</code> and adding your private key each time you open a terminal.</p>

<h2 id="why-use-ssh-agent">Why Use ssh-agent?</h2>

<p><code class="language-plaintext highlighter-rouge">ssh-agent</code> is a background process that manages your private keys and provides secure authentication without requiring
you to repeatedly enter your passphrase. Once your private key is loaded into the agent, it remains available for use
during the session.</p>

<p>You can manually start <code class="language-plaintext highlighter-rouge">ssh-agent</code> by running:</p>

<div class="language-bash highlighter-rouge"><div class="highlight"><pre class="highlight"><code><span class="nb">eval</span> <span class="si">$(</span>ssh-agent <span class="nt">-s</span><span class="si">)</span>
</code></pre></div></div>

<p>This command starts the agent and sets the necessary environment variables, such as <code class="language-plaintext highlighter-rouge">SSH_AUTH_SOCK</code>, which allows other
processes to communicate with the agent.</p>

<p>To add your private key to the agent, use the <code class="language-plaintext highlighter-rouge">ssh-add</code> command:</p>

<div class="language-bash highlighter-rouge"><div class="highlight"><pre class="highlight"><code>ssh-add ~/.ssh/id_rsa
</code></pre></div></div>

<p>Replace <code class="language-plaintext highlighter-rouge">~/.ssh/id_rsa</code> with the path to your private key if it’s not the default location.</p>

<h2 id="automate-the-process">Automate the Process</h2>

<p>To avoid repeating these steps every time you open a terminal, you can add them to your Bash startup script.</p>

<h3 id="edit-your-bash-startup-script">Edit Your Bash Startup Script</h3>

<p>The appropriate script depends on how your terminal starts:</p>

<ul>
  <li><strong>For login shells:</strong> Edit <code class="language-plaintext highlighter-rouge">~/.bash_profile</code> or <code class="language-plaintext highlighter-rouge">~/.profile</code>.</li>
  <li><strong>For non-login shells:</strong> Edit <code class="language-plaintext highlighter-rouge">~/.bashrc</code>.</li>
</ul>

<p>Typically, you’ll want to modify <code class="language-plaintext highlighter-rouge">~/.bashrc</code>:</p>

<div class="language-bash highlighter-rouge"><div class="highlight"><pre class="highlight"><code>nano ~/.bashrc
</code></pre></div></div>

<p><strong>Add the following code:</strong></p>

<div class="language-bash highlighter-rouge"><div class="highlight"><pre class="highlight"><code><span class="c"># Start ssh-agent and add SSH private key</span>
<span class="k">if</span> <span class="o">[</span> <span class="nt">-z</span> <span class="s2">"</span><span class="nv">$SSH_AUTH_SOCK</span><span class="s2">"</span> <span class="o">]</span><span class="p">;</span> <span class="k">then
    </span><span class="nb">eval</span> <span class="s2">"</span><span class="si">$(</span>ssh-agent <span class="nt">-s</span><span class="si">)</span><span class="s2">"</span> <span class="o">&gt;</span> /dev/null
<span class="k">fi</span>

<span class="c"># Add the private key to ssh-agent</span>
ssh-add ~/.ssh/id_rsa <span class="o">&gt;</span> /dev/null 2&gt;&amp;1
</code></pre></div></div>

<ul>
  <li><strong><code class="language-plaintext highlighter-rouge">if [ -z "$SSH_AUTH_SOCK" ]</code>:</strong> Ensures that <code class="language-plaintext highlighter-rouge">ssh-agent</code> is started only if it’s not already running.</li>
  <li><strong><code class="language-plaintext highlighter-rouge">ssh-add ~/.ssh/id_rsa</code>:</strong> Adds your private key to the agent.</li>
  <li><strong>Output redirection (<code class="language-plaintext highlighter-rouge">&gt; /dev/null 2&gt;&amp;1</code>)</strong>: Suppresses output for a cleaner terminal experience.</li>
</ul>

<h3 id="apply-the-changes">Apply the changes</h3>

<p>After editing your <code class="language-plaintext highlighter-rouge">~/.bashrc</code>, reload it to apply the changes:</p>

<div class="language-bash highlighter-rouge"><div class="highlight"><pre class="highlight"><code><span class="nb">source</span> ~/.bashrc
</code></pre></div></div>

<hr />

<h3 id="verify-the-setup">Verify the Setup</h3>

<p>To check if <code class="language-plaintext highlighter-rouge">ssh-agent</code> is running and your key is added:</p>

<ol>
  <li>
    <p>Verify the agent is running:</p>

    <div class="language-bash highlighter-rouge"><div class="highlight"><pre class="highlight"><code><span class="nb">echo</span> <span class="nv">$SSH_AUTH_SOCK</span>
</code></pre></div>    </div>

    <p>If the output is a valid file path, the agent is active.</p>
  </li>
  <li>
    <p>List the loaded keys:</p>

    <div class="language-bash highlighter-rouge"><div class="highlight"><pre class="highlight"><code>ssh-add <span class="nt">-l</span>
</code></pre></div>    </div>

    <p>If your key is listed, the setup is working.</p>
  </li>
</ol>

<hr />

<h3 id="handling-multiple-keys">Handling Multiple Keys</h3>

<p>If you use multiple SSH keys, you can add them by repeating the <code class="language-plaintext highlighter-rouge">ssh-add</code> command for each key:</p>

<div class="language-bash highlighter-rouge"><div class="highlight"><pre class="highlight"><code>ssh-add ~/.ssh/id_rsa
ssh-add ~/.ssh/id_ed25519
</code></pre></div></div>

<p>Alternatively, you can store all your keys in a file and loop through them:</p>

<div class="language-bash highlighter-rouge"><div class="highlight"><pre class="highlight"><code><span class="k">for </span>key <span class="k">in</span> ~/.ssh/<span class="k">*</span><span class="p">;</span> <span class="k">do</span>
    <span class="o">[</span> <span class="nt">-f</span> <span class="s2">"</span><span class="nv">$key</span><span class="s2">"</span> <span class="o">]</span> <span class="o">&amp;&amp;</span> ssh-add <span class="s2">"</span><span class="nv">$key</span><span class="s2">"</span> <span class="o">&gt;</span> /dev/null 2&gt;&amp;1
<span class="k">done</span>
</code></pre></div></div>

<hr />

<h3 id="optional-persistent-ssh-agent-sessions">Optional: Persistent ssh-agent Sessions</h3>

<p>If you want <code class="language-plaintext highlighter-rouge">ssh-agent</code> to persist across terminal sessions, consider using a tool like <strong>keychain</strong>. Keychain manages
<code class="language-plaintext highlighter-rouge">ssh-agent</code> and reuses the same agent for all your sessions.</p>

<p>Install keychain (on Debian/Ubuntu):</p>

<div class="language-bash highlighter-rouge"><div class="highlight"><pre class="highlight"><code><span class="nb">sudo </span>apt-get <span class="nb">install </span>keychain
</code></pre></div></div>

<p>Add the following to your <code class="language-plaintext highlighter-rouge">~/.bashrc</code>:</p>

<div class="language-bash highlighter-rouge"><div class="highlight"><pre class="highlight"><code><span class="nb">eval</span> <span class="si">$(</span>keychain <span class="nt">--eval</span> <span class="nt">--agents</span> ssh id_rsa<span class="si">)</span>
</code></pre></div></div>

<p>This approach ensures <code class="language-plaintext highlighter-rouge">ssh-agent</code> is available in all terminal sessions without restarting it.</p>

<hr />

<p>By automating the activation of <code class="language-plaintext highlighter-rouge">ssh-agent</code> and adding your private keys, you can save time and simplify your workflow.
Whether you use the manual setup or tools like keychain, this setup ensures secure and seamless SSH access every time
you open a terminal.</p>]]></content><author><name>cicnavi</name></author><category term="Programming" /><summary type="html"><![CDATA[Automatic ssh-agent Activation When Opening bash]]></summary></entry><entry><title type="html">Customizing Git Configuration Based on Remote Repositories</title><link href="https://markoivancic.from.hr/customizing-git-configuration-based-on-remote-repositories" rel="alternate" type="text/html" title="Customizing Git Configuration Based on Remote Repositories" /><published>2025-01-10T08:36:44+01:00</published><updated>2025-01-10T08:36:44+01:00</updated><id>https://markoivancic.from.hr/customizing-git-configuration-based-on-remote-repositories</id><content type="html" xml:base="https://markoivancic.from.hr/customizing-git-configuration-based-on-remote-repositories"><![CDATA[<h1 id="customizing-git-configuration-based-on-remote-repositories">Customizing Git Configuration Based on Remote Repositories</h1>

<p>When working with multiple Git repositories, such as a private workplace repository and a public GitHub repository,
you might want to use different configurations for <code class="language-plaintext highlighter-rouge">user.name</code> and <code class="language-plaintext highlighter-rouge">user.email</code>. For instance, your workplace might
require you to use your corporate email, while you might want to use your personal email for GitHub. In this blog post,
we’ll explore how to dynamically set Git configuration based on the remote repository using Git’s <code class="language-plaintext highlighter-rouge">includeIf</code> directive.</p>

<hr />

<h2 id="problem-overview">Problem Overview</h2>

<p>By default, Git applies global configurations from your <code class="language-plaintext highlighter-rouge">~/.gitconfig</code> file to all repositories. However, this can
become problematic when:</p>

<ul>
  <li>You need to use different identities for different repositories.</li>
  <li>Switching between private and public repositories requires manual updates to your configuration.</li>
</ul>

<p>Fortunately, Git provides a powerful feature for conditional configuration which automatically enables us to apply the
correct configuration based on the remote repository.</p>

<hr />

<h2 id="conditional-configuration-using-includeif">Conditional Configuration Using <code class="language-plaintext highlighter-rouge">includeIf</code></h2>

<p>Git’s <code class="language-plaintext highlighter-rouge">includeIf</code> directive allows you to specify separate configuration files that are applied based on certain
conditions. One such condition is <code class="language-plaintext highlighter-rouge">hasconfig:remote.*.url</code>, which matches remote URLs using glob patterns.</p>

<p>Here’s how we can configure Git to apply different <code class="language-plaintext highlighter-rouge">user.name</code> and <code class="language-plaintext highlighter-rouge">user.email</code> values based on the remote
repository URL.</p>

<h3 id="step-1-edit-your-global-git-configuration">Step 1: Edit Your Global Git Configuration</h3>

<p>Open your global Git configuration file (<code class="language-plaintext highlighter-rouge">~/.gitconfig</code>) in your favorite editor:</p>

<div class="language-bash highlighter-rouge"><div class="highlight"><pre class="highlight"><code>git config <span class="nt">--global</span> <span class="nt">--edit</span>
</code></pre></div></div>

<p>Add the following lines to include separate configurations based on the remote URL:</p>

<div class="language-plaintext highlighter-rouge"><div class="highlight"><pre class="highlight"><code>[includeIf "hasconfig:remote.*.url:*github.com*/**"]
    path = ~/.gitconfig-github

[includeIf "hasconfig:remote.*.url:*your-workplace.gitserver.com*/**"]
    path = ~/.gitconfig-work
</code></pre></div></div>

<h3 id="step-2-create-separate-config-files">Step 2: Create Separate Config Files</h3>

<p>Create the additional configuration files that the <code class="language-plaintext highlighter-rouge">includeIf</code> directive references.</p>

<h4 id="github-configuration">GitHub Configuration</h4>
<p>Create <code class="language-plaintext highlighter-rouge">~/.gitconfig-github</code> with the following content:</p>

<div class="language-plaintext highlighter-rouge"><div class="highlight"><pre class="highlight"><code>[user]
    name = GitHub User
    email = github.user@example.com
</code></pre></div></div>

<h4 id="workplace-configuration">Workplace Configuration</h4>
<p>Create <code class="language-plaintext highlighter-rouge">~/.gitconfig-work</code> with the following content:</p>

<div class="language-plaintext highlighter-rouge"><div class="highlight"><pre class="highlight"><code>[user]
    name = Work User
    email = work.user@company.com
</code></pre></div></div>

<h3 id="step-3-verify-remote-urls">Step 3: Verify Remote URLs</h3>

<p>To ensure that the configuration applies correctly, confirm the remote URLs of your repositories:</p>

<div class="language-bash highlighter-rouge"><div class="highlight"><pre class="highlight"><code>git remote <span class="nt">-v</span>
</code></pre></div></div>

<p>For GitHub, the URL might look like:</p>

<div class="language-plaintext highlighter-rouge"><div class="highlight"><pre class="highlight"><code>git@github.com:username/repo.git
</code></pre></div></div>

<p>For the workplace repository, it might look like:</p>

<div class="language-plaintext highlighter-rouge"><div class="highlight"><pre class="highlight"><code>https://your-workplace.gitserver.com/repo.git
</code></pre></div></div>

<h3 id="step-4-test-the-configuration">Step 4: Test the Configuration</h3>

<p>Navigate to a repository and verify the applied <code class="language-plaintext highlighter-rouge">user.name</code> and <code class="language-plaintext highlighter-rouge">user.email</code>:</p>

<div class="language-bash highlighter-rouge"><div class="highlight"><pre class="highlight"><code>git config user.name
git config user.email
</code></pre></div></div>

<p>You can also check the origin of the configuration:</p>

<div class="language-bash highlighter-rouge"><div class="highlight"><pre class="highlight"><code>git config <span class="nt">--show-origin</span> user.email
</code></pre></div></div>

<p>This will confirm which configuration file is being used.</p>

<hr />

<h2 id="why-githubcom-works">Why <code class="language-plaintext highlighter-rouge">*github.com*/**</code> Works</h2>

<p>Git interprets remote URLs hierarchically, so <code class="language-plaintext highlighter-rouge">/**</code> is required to match the path structure after <code class="language-plaintext highlighter-rouge">github.com</code>. 
The pattern, <code class="language-plaintext highlighter-rouge">*github.com*/**</code>, ensures:</p>

<ul>
  <li>It matches any URL containing <code class="language-plaintext highlighter-rouge">github.com</code>.</li>
  <li>It accounts for additional components in the URL (e.g., <code class="language-plaintext highlighter-rouge">/username/repo.git</code>).</li>
</ul>

<p>Similarly, for the workplace repository, <code class="language-plaintext highlighter-rouge">*your-workplace.gitserver.com*/**</code> ensures a proper match.</p>

<hr />

<h2 id="debugging-tips">Debugging Tips</h2>

<p>If the configuration doesn’t work as expected:</p>

<ol>
  <li><strong>Check Git Version</strong>:
Ensure you are using Git 2.38 or later:
    <div class="language-bash highlighter-rouge"><div class="highlight"><pre class="highlight"><code>git <span class="nt">--version</span>
</code></pre></div>    </div>
  </li>
  <li><strong>Check Remote URL</strong>:
Verify the remote URL with:
    <div class="language-bash highlighter-rouge"><div class="highlight"><pre class="highlight"><code>git remote <span class="nt">-v</span>
</code></pre></div>    </div>
  </li>
  <li><strong>Trace Configuration Loading</strong>:
Use the following command to debug how Git applies configurations:
    <div class="language-bash highlighter-rouge"><div class="highlight"><pre class="highlight"><code><span class="nv">GIT_TRACE</span><span class="o">=</span>1 git config user.email
</code></pre></div>    </div>
  </li>
</ol>

<hr />

<h2 id="conclusion">Conclusion</h2>

<p>Using conditional configuration in Git can save you from the hassle of manually switching <code class="language-plaintext highlighter-rouge">user.name</code> and <code class="language-plaintext highlighter-rouge">user.email</code>
for different repositories. By leveraging <code class="language-plaintext highlighter-rouge">includeIf</code> and patterns like <code class="language-plaintext highlighter-rouge">*github.com*/**</code>, you can dynamically apply
the correct identity based on the remote URL.</p>

<p>This approach not only simplifies your workflow but also ensures you’re always using the right credentials for the
right repositories.</p>]]></content><author><name>cicnavi</name></author><category term="Programming" /><summary type="html"><![CDATA[Customizing Git Configuration Based on Remote Repositories]]></summary></entry><entry><title type="html">Implementing OpenID Federation Specification in SimpleSAMLphp: GEANT T&amp;amp;I Incubator</title><link href="https://markoivancic.from.hr/openid-federation-in-simplesamlphp-geant-ti-incubator" rel="alternate" type="text/html" title="Implementing OpenID Federation Specification in SimpleSAMLphp: GEANT T&amp;amp;I Incubator" /><published>2024-12-13T14:36:44+01:00</published><updated>2024-12-13T14:36:44+01:00</updated><id>https://markoivancic.from.hr/openid-federation-in-simplesamlphp-geant-ti-incubator</id><content type="html" xml:base="https://markoivancic.from.hr/openid-federation-in-simplesamlphp-geant-ti-incubator"><![CDATA[<p>As part of my participation in the GEANT Trust and Identity Incubator project, I had the opportunity to implement the
OpenID Federation specification in <strong>SimpleSAMLphp</strong>. This project involved working on the <strong>oidc module</strong> of
SimpleSAMLphp, enhancing its capabilities by introducing automatic client registration capabilities, a significant
feature in the OpenID Federation specification.</p>

<h4 id="overview-of-the-project">Overview of the Project</h4>

<p>The main objective of the project was to extend the <strong>SimpleSAMLphp OIDC module</strong> (available
<a href="https://github.com/simplesamlphp/simplesamlphp-module-oidc">here</a>) to support the OpenID Federation specification.</p>

<p>This implementation was done by developing a dedicated library that included essential tools such as
<strong>Trust Chain</strong> and <strong>metadata</strong> resolution. The resulting library can be found
<a href="https://github.com/simplesamlphp/openid">here</a>.</p>

<h4 id="key-features-implemented">Key Features Implemented</h4>

<ol>
  <li><strong>Automatic Client Registration</strong>:
    <ul>
      <li>This feature allows Relying Parties to register automatically, provided they meet the federation’s trust
requirements.</li>
      <li>Trust Chains were validated and used to determine the eligibility of RPs for registration, ensuring secure and 
streamlined onboarding.</li>
    </ul>
  </li>
  <li><strong>Trust Chain Resolution</strong>:
    <ul>
      <li>Developed mechanisms to dynamically fetch, resolve, and validate <strong>entity configurations</strong> and subordinate
statements using <strong>authority hints</strong>.</li>
      <li>The library incorporates caches for efficient entity configuration and Trust Chain management.</li>
    </ul>
  </li>
  <li><strong>Federation Endpoints</strong>:
    <ul>
      <li>New federation-specific endpoints were introduced in <strong>oidc</strong> module for issuing <strong>entity statements</strong></li>
    </ul>
  </li>
</ol>

<p>Ensuring compatibility with other OpenID implementations was crucial. This involved extensive testing and validation
using various tools, including testbed environments provided by the Incubator.</p>

<h4 id="demonstration-and-future-prospects">Demonstration and Future Prospects</h4>
<p>The module was tested in real-world scenarios, showcasing its capabilities in integrating Relying Parties into
federated ecosystems. The implementation paves the way for broader adoption of OpenID Federation in education and
research communities.</p>

<p>With the OpenID Federation standard gaining traction, this work contributes to advancing <strong>interoperability</strong>,
<strong>security</strong>, and <strong>automation</strong> in identity federation systems. Future development may involve extending this
implementation to other systems and enhancing the scalability of the solution.</p>

<p>I had the privilege to present the outcomes during the GEANT Incubator’s <strong>Public Sprint Demo</strong> on December 17, 2024.
The recording is available here: <a href="https://surfdrive.surf.nl/files/index.php/s/bzO4H037LWQ7P4w">https://surfdrive.surf.nl/files/index.php/s/bzO4H037LWQ7P4w</a></p>]]></content><author><name>cicnavi</name></author><category term="Programming" /><summary type="html"><![CDATA[As part of my participation in the GEANT Trust and Identity Incubator project, I had the opportunity to implement the OpenID Federation specification in SimpleSAMLphp. This project involved working on the oidc module of SimpleSAMLphp, enhancing its capabilities by introducing automatic client registration capabilities, a significant feature in the OpenID Federation specification.]]></summary></entry><entry><title type="html">GEANT T&amp;amp;I Incubator - SAML Signature Validation</title><link href="https://markoivancic.from.hr/geant-ti-incubator-saml-signature-validation" rel="alternate" type="text/html" title="GEANT T&amp;amp;I Incubator - SAML Signature Validation" /><published>2023-12-13T14:36:44+01:00</published><updated>2023-12-13T14:36:44+01:00</updated><id>https://markoivancic.from.hr/geant-ti-incubator-saml-signature-validation</id><content type="html" xml:base="https://markoivancic.from.hr/geant-ti-incubator-saml-signature-validation"><![CDATA[<h2 id="enhancing-saml-security-insights-from-the-geant-trust--identity-incubator">Enhancing SAML Security: Insights from the GEANT Trust &amp; Identity Incubator</h2>

<p>I had the opportunity to contribute to the <strong>GEANT Trust &amp; Identity Incubator</strong> (T&amp;I Incubator), where we tackled a
pressing challenge: ensuring robust SAML signature validation across federations. This was a critical effort aimed
at strengthening the security of Service Providers (SPs) within national research and education networks (NRENs).</p>

<h2 id="why-saml-signature-validation-matters">Why SAML Signature Validation Matters</h2>

<p>SAML (Security Assertion Markup Language) is foundational for identity federation, enabling secure communication
between Identity Providers (IdPs) and SPs. However, misconfigurations or vulnerabilities in SPs can lead to security
gaps. Proper signature validation ensures that SAML assertions are genuine, tamper-proof, and from trusted
sources, which is essential for safeguarding sensitive academic and research data.</p>

<h2 id="project-goals-and-use-cases">Project Goals and Use Cases</h2>

<p>Our goal was to develop a scalable software solution to test SAML deployments’ core security aspects. We targeted
several use cases, including:</p>
<ul>
  <li>Self-testing by SPs preparing for production deployment.</li>
  <li>Automated testing during SP onboarding or periodic reviews by federation operators (FedOps)</li>
</ul>

<h2 id="technical-innovations-and-tools">Technical Innovations and Tools</h2>

<p>The project leveraged the <strong>Nuclei vulnerability scanner</strong>, known for its extensive library and automation capabilities.
Custom templates were created to simulate various test scenarios, such as invalid or missing signatures. Key highlights
included:</p>
<ul>
  <li><strong>Test IdP</strong>: A SimpleSAMLphp instance with a custom “conformance” module for flexible test configurations.</li>
  <li><strong>Deployment Flexibility</strong>: The solution supported multiple SP implementations, including SimpleSAMLphp, Keycloak,
and Shibboleth.</li>
</ul>

<h4 id="delivering-impact">Delivering Impact</h4>

<p>The sprint demo showcased our progress, highlighting successful validation tests against both compliant and
non-compliant SP setups. By enabling proactive security checks, the project promises to help NRENs maintain a
trustworthy identity federation ecosystem.</p>

<p>The final demo is available here: <a href="https://wiki.geant.org/download/attachments/662800889/Signature-validation_mid-demo.mp4?version=1&amp;modificationDate=1707388186613&amp;api=v2">SAML Signature Validation demo</a></p>

<p>The SimpleSAMLphp module is available here: <a href="https://github.com/cicnavi/simplesamlphp-module-conformance">https://github.com/cicnavi/simplesamlphp-module-conformance</a></p>

<h4 id="reflections-and-next-steps">Reflections and Next Steps</h4>

<p>Participating in the T&amp;I Incubator reinforced the importance of collaboration between technical, operational, and legal
stakeholders. As we refine the solution, the focus will be on streamlining deployment and extending support to a broader
range of SPs.</p>

<p>This project was a rewarding journey into the complexities of identity federation security. It’s a step forward in
fostering trust and resilience in global research and education networks.</p>]]></content><author><name>cicnavi</name></author><category term="Programming" /><summary type="html"><![CDATA[Enhancing SAML Security: Insights from the GEANT Trust &amp; Identity Incubator]]></summary></entry><entry><title type="html">SimpleSAMLphp Personal Profile Page</title><link href="https://markoivancic.from.hr/simplesamlphp-personal-profile-page-presentation" rel="alternate" type="text/html" title="SimpleSAMLphp Personal Profile Page" /><published>2022-12-13T14:36:44+01:00</published><updated>2022-12-13T14:36:44+01:00</updated><id>https://markoivancic.from.hr/simplesamlphp-personal-profile-page-presentation</id><content type="html" xml:base="https://markoivancic.from.hr/simplesamlphp-personal-profile-page-presentation"><![CDATA[<p>In 2022. and 2023, I’ve participated in a GÉANT Trust &amp; Identity Incubator project for creating a
“Personal Profile Page” in Shibboleth and SimpleSAMLphp software. I’ve worked on the SimpleSAMLphp part, by creating
a dedicated module which is available here:
<a href="https://github.com/cicnavi/simplesamlphp-module-profilepage">https://github.com/cicnavi/simplesamlphp-module-profilepage</a></p>

<p>Some of the module features are:</p>
<ul>
  <li>Enables tracking of authentication events, synchronously (during authentication event) or asynchronously (in a
separate process using SimpleSAMLphp Cron feature)</li>
  <li>Provides endpoints for end users to check their personal data, summary on connected Service Providers, and list of
authentication events</li>
  <li>Comes with default DBAL backend storage, meaning the following database vendors can be used: MySQL, Oracle, Microsoft
SQL Server, PostgreSQL, SQLite. Other backend storages can be added by following proper interfaces.</li>
  <li>Comes with setup procedure which sets up backend storage. In case of Doctrine DBAL this means running SQL migrations
which create proper tables in configured database.</li>
  <li>Each backend storage connection can have master and slave configuration (master for writing, slave for reading)</li>
  <li>Has tracking functionality available which persist authentication data to backend storage. Currently, module can track
connected services and authentication events. Other trackers can be added by following proper interfaces.</li>
  <li>Tracking can run in two ways:
    <ul>
      <li>synchronously - authentication data persisted during authentication event typically with multiple queries / inserts
/ updates to backend storage.</li>
      <li>asynchronously - only authentication event job is persisted during authentication event (one insert to backend
storage). With this approach, authentication event jobs can be executed later in a separate process using
SimpleSAMLphp cron module</li>
    </ul>
  </li>
</ul>

<p>The final video presentation of the project is available here:</p>

<p><a href="https://wiki.geant.org/display/GWP5/Further+improve+the+personal+profile+page?preview=/589070368/695042748/Profile_page_final-demo.mp4">https://wiki.geant.org/display/GWP5/Further+improve+the+personal+profile+page?preview=/589070368/695042748/Profile_page_final-demo.mp4</a></p>]]></content><author><name>cicnavi</name></author><category term="Programming" /><summary type="html"><![CDATA[In 2022. and 2023, I’ve participated in a GÉANT Trust &amp; Identity Incubator project for creating a “Personal Profile Page” in Shibboleth and SimpleSAMLphp software. I’ve worked on the SimpleSAMLphp part, by creating a dedicated module which is available here: https://github.com/cicnavi/simplesamlphp-module-profilepage]]></summary></entry><entry><title type="html">OpenID Connect OP Support in SimpleSAMLphp</title><link href="https://markoivancic.from.hr/openid-connect-support-in-simplesamlphp" rel="alternate" type="text/html" title="OpenID Connect OP Support in SimpleSAMLphp" /><published>2021-09-21T15:36:44+02:00</published><updated>2021-09-21T15:36:44+02:00</updated><id>https://markoivancic.from.hr/openid-connect-support-in-simplesamlphp</id><content type="html" xml:base="https://markoivancic.from.hr/openid-connect-support-in-simplesamlphp"><![CDATA[<p>In 2021. I’ve participated in a GÉANT Trust &amp; Identity Incubator project for adding OpenID
Connect OP support in SimpleSAMLphp software together with Sergio Gomes and Patrick Radtke.</p>

<p>SSP is one of the most widely used IdP/SP software in the GÉANT community. Furthermore, the adoption
of OIDC is growing steadily, especially third-parties use it commonly. The OP module offers NRENs and institutions
an easy way to provide an OIDC IdP.</p>

<p>The result of the project is a dedicated SimpleSAMLphp module available here:
<a href="https://github.com/simplesamlphp/simplesamlphp-module-oidc">https://github.com/simplesamlphp/simplesamlphp-module-oidc</a></p>

<p>Currently supported flows with passing conformance tests are:</p>
<ul>
  <li>Authorization Code flow, with PKCE support (response_type ‘code’)</li>
  <li>Implicit flow (response_type ‘id_token token’ or ‘id_token’)</li>
  <li>Refresh Token flow</li>
</ul>

<p>The final presentation of the project is available here:
<a href="https://wiki.geant.org/download/attachments/320471174/SSP-OIDC_demo.mp4?version=1&amp;modificationDate=1632930580727&amp;api=v2">https://wiki.geant.org/download/attachments/320471174/SSP-OIDC_demo.mp4?version=1&amp;modificationDate=1632930580727&amp;api=v2</a></p>]]></content><author><name>cicnavi</name></author><category term="Programming" /><summary type="html"><![CDATA[In 2021. I’ve participated in a GÉANT Trust &amp; Identity Incubator project for adding OpenID Connect OP support in SimpleSAMLphp software together with Sergio Gomes and Patrick Radtke.]]></summary></entry><entry><title type="html">OpenID Connect Webinar</title><link href="https://markoivancic.from.hr/openid-connect-webinar/" rel="alternate" type="text/html" title="OpenID Connect Webinar" /><published>2021-03-20T14:36:44+01:00</published><updated>2021-03-20T14:36:44+01:00</updated><id>https://markoivancic.from.hr/openid-connect-webinar</id><content type="html" xml:base="https://markoivancic.from.hr/openid-connect-webinar/"><![CDATA[<p>On March 18th, 2021. I’ve held a webinar on the topic of OpenID protocol implementation and usage in the AAI@EduHr
authentication and authorization infrastructure.</p>

<iframe width="560" height="315" src="https://www.youtube.com/embed/rdk-JFF3r3I?si=zk4O2YnQgjOnznPo" title="YouTube video player" frameborder="0" allow="accelerometer; autoplay; clipboard-write; encrypted-media;
gyroscope; picture-in-picture; web-share" allowfullscreen=""></iframe>]]></content><author><name>cicnavi</name></author><category term="Programming" /><summary type="html"><![CDATA[On March 18th, 2021. I’ve held a webinar on the topic of OpenID protocol implementation and usage in the AAI@EduHr authentication and authorization infrastructure.]]></summary></entry><entry><title type="html">Docker image with PHP 8 and Xdebug 3</title><link href="https://markoivancic.from.hr/docker-image-with-php-8-and-xdebug-3" rel="alternate" type="text/html" title="Docker image with PHP 8 and Xdebug 3" /><published>2020-12-02T14:36:44+01:00</published><updated>2020-12-02T14:36:44+01:00</updated><id>https://markoivancic.from.hr/docker-image-with-php-8-and-xdebug-3</id><content type="html" xml:base="https://markoivancic.from.hr/docker-image-with-php-8-and-xdebug-3"><![CDATA[<p>PHP 8.0 is now released, as well as <a href="https://hub.docker.com/_/php">official PHP docker images</a>
which you can use as a base for creating (development) environments to suit your needs.</p>

<p>With the release of PHP 8, the must-have development tool Xdebug version 3 is also released, which brings many great
new features, but also a change in configuration options.</p>

<h2 id="dockerfile">Dockerfile</h2>

<p>Here is the Dockerfile I use to create a Debian container with PHP 8:</p>

<p><a href="https://github.com/cicnavi/dockers/blob/master/dap/80/Dockerfile">https://github.com/cicnavi/dockers/blob/master/dap/80/Dockerfile</a></p>

<h2 id="xdebug-3-configuration">Xdebug 3 configuration</h2>
<p>Since Xdebug version 3, there are different config options used to start up the debug process. Main difference is to 
use option ‘xdebug.mode‘ to set the way in which the Xdebug will run, ‘xdebug.discover_client_host’ to set how will
Xdebug find about the client host to connect to, and the new default port which is now 9003.</p>

<p>Another important setting is ‘xdebug.client_host’ which should be set to ‘host.docker.internal’ when working with 
Docker containers.</p>

<p>Full settings that I use are listed in .ini file:</p>

<p><a href="https://github.com/cicnavi/dockers/blob/master/dap/80/php-config/custom.ini">https://github.com/cicnavi/dockers/blob/master/dap/80/php-config/custom.ini</a></p>]]></content><author><name>cicnavi</name></author><category term="Programming" /><summary type="html"><![CDATA[PHP 8.0 is now released, as well as official PHP docker images which you can use as a base for creating (development) environments to suit your needs.]]></summary></entry><entry><title type="html">My Laravel Upgrade Flow</title><link href="https://markoivancic.from.hr/my-laravel-upgrade-flow" rel="alternate" type="text/html" title="My Laravel Upgrade Flow" /><published>2020-04-20T15:36:44+02:00</published><updated>2020-04-20T15:36:44+02:00</updated><id>https://markoivancic.from.hr/my-laravel-upgrade-flow</id><content type="html" xml:base="https://markoivancic.from.hr/my-laravel-upgrade-flow"><![CDATA[<p>If you work with Laravel PHP framework like me, you have surely done an upgrade to a newer version of Laravel. In this
article I want to share an upgrade workflow that I usually do when I upgrade some Laravel app.</p>

<p>The steps that I present here can ensure that you have considered all the customization in your current app, while also
taking into account all the modifications that are introduced in the new Laravel version.</p>

<p>Let’s say that we have an app that is currently run on Laravel 5.5.* and that we want to bump it to Laravel 7.*.</p>

<p>Just to note, my dev setup is:</p>
<ul>
  <li>Windows with WSL (Linux Subsystem)</li>
  <li>Docker (Debian, Apache, PHP)</li>
  <li>PHPStorm</li>
  <li>Git</li>
</ul>

<h2 id="steps-for-upgrade-from-laravel-55-to-laravel-7">Steps for upgrade from Laravel 5.5.* to Laravel 7.*</h2>

<h3 id="git">Git</h3>

<p>The first thing I do is create the following:</p>

<ul>
  <li>in the current app repository create a new Git branch from ‘master’ branch. It can be called something like
‘laravel-7-upgrade’. This branch is used to do all code modifications regarding upgrade process, in the current app.
When we are ready at the end, we will merge it with the ‘master’ branch. The sample command to do this is:</li>
</ul>

<div class="language-shell highlighter-rouge"><div class="highlight"><pre class="highlight"><code><span class="nb">cd</span> ~/projects/app
git checkout master
git checkout <span class="nt">-b</span> laravel-7-upgrade
</code></pre></div></div>

<ul>
  <li>create a new app which will hold a Laravel 7 base installation. When I say ‘base installation’, I mean installation
of Laravel without any custom modifications. We will use this new app to check and sync code between Laravel 5.5.* app
and Laravel 7.* app. The result we want is to have our current app and a Laravel 7 app in sync. To create a new Laravel
7 app, create a new Laravel project (of course in a separate directory):</li>
</ul>

<div class="language-shell highlighter-rouge"><div class="highlight"><pre class="highlight"><code><span class="nb">cd</span> ..
composer create-project <span class="nt">--prefer-dist</span> laravel/laravel:7.<span class="k">*</span> laravel-7-base-installation
</code></pre></div></div>

<ul>
  <li>create a new app which will hold a Laravel 5.5.* base installation. We will use this app to check the differences
between our production Laravel 5.5.* app and a basic Laravel 5.5.* installation. This way we can be sure about all the
custom things that we have introduced in the current app.</li>
</ul>

<div class="language-shell highlighter-rouge"><div class="highlight"><pre class="highlight"><code>composer create-project <span class="nt">--prefer-dist</span> laravel/laravel:5.5.<span class="k">*</span> laravel-55-base-installation
</code></pre></div></div>

<h3 id="comparing-code">Comparing Code</h3>
<p>The next step is to compare the code in the current app to the Laravel 7 base installation, and sync all the changes.
While we do this we can also reference the Laravel 5 base installation, so we can be sure about our custom modifications
in the current app. Let me show you what I mean.</p>

<p>
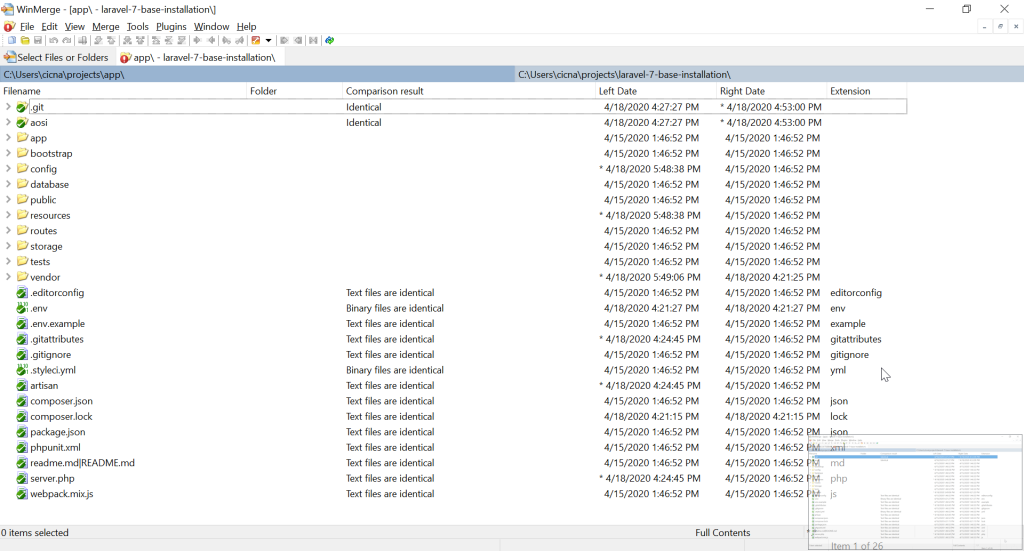
To do code comparison I use an app called <a href="https://winmerge.org/?lang=en">WinMerge</a>. It is an Open Source differencing
and merging tool for Windows. It can compare both folders and files, presenting differences in a visual text format that
is easy to understand and handle.</p>

<p>Let’s compare our current app with the Laravel 7 installation.</p>

<p><img src="/assets/images/posts/2020-04-18-my-laravel-upgrade-flow/img.png" alt="Img" /></p>

<p>
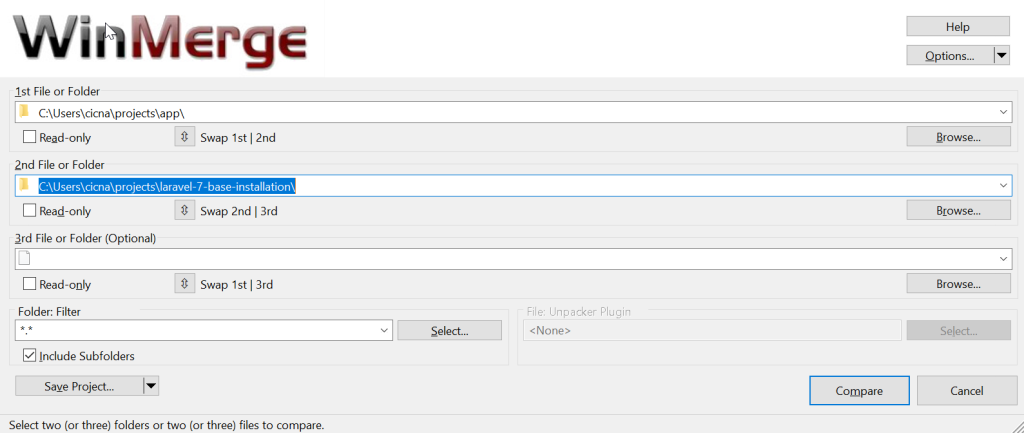
In another WinMerge window, I’ll also do a comparison for current app and a Laravel 5.5 base installation.</p>

<p><img src="/assets/images/posts/2020-04-18-my-laravel-upgrade-flow/img_1.png" alt="Img" /></p>

<p>
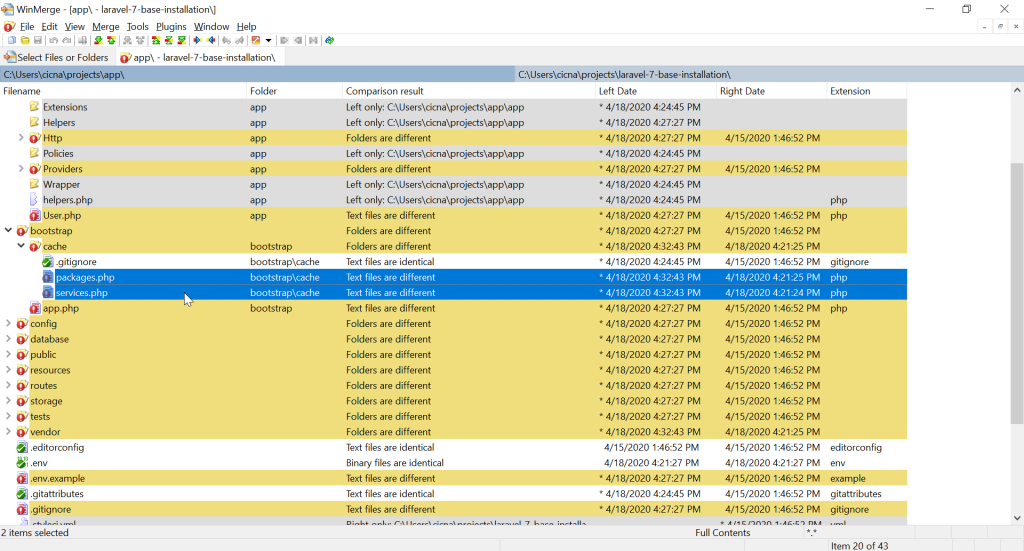
Now, let’s take a look in comparison results for Laravel 7 base installation. Note the marked ‘Left only’ result.</p>

<p><img src="/assets/images/posts/2020-04-18-my-laravel-upgrade-flow/img_2.png" alt="Img" /></p>

<p>
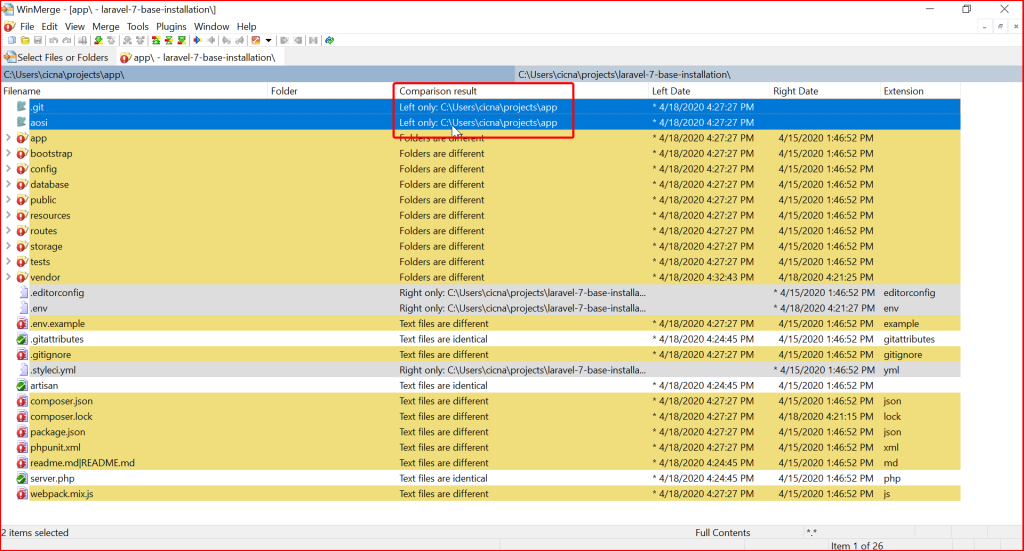
The ‘Left only’ means that those two folders exist only in our current app. I will copy those two folders to the Laravel
7 installation, so we can keep track of all the changes we have made when comparing our current installation with Laravel
7 installation. Remember, the final result we want is that the current app and a Laravel 7 app are in sync (that it has
same content). To copy selected directories we can use button ‘Copy right’:</p>

<p><img src="/assets/images/posts/2020-04-18-my-laravel-upgrade-flow/img_3.png" alt="Img" /></p>

<p><img src="/assets/images/posts/2020-04-18-my-laravel-upgrade-flow/img_4.png" alt="Img" /></p>

<p>
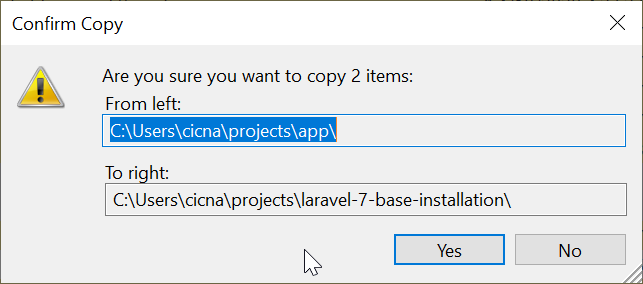
This action will place marked directories in the Laravel 7 app. If we refresh the comparison results (press F5 or click
refresh button), we will see that they are now marked as ‘Identical’.</p>

<p><img src="/assets/images/posts/2020-04-18-my-laravel-upgrade-flow/img_5.png" alt="Img" /></p>

<p>Let’s take a look at the next example. We have a ‘Kernel.php’ file with different text.</p>

<p><img src="/assets/images/posts/2020-04-18-my-laravel-upgrade-flow/img_6.png" alt="Img" /></p>

<p>
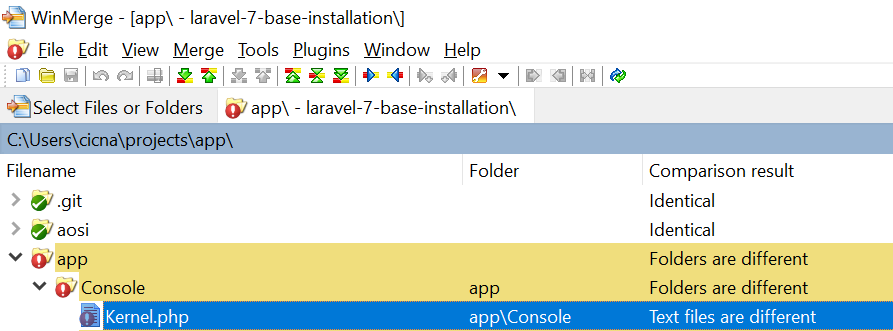
When we open it, we see the next difference.</p>

<p><img src="/assets/images/posts/2020-04-18-my-laravel-upgrade-flow/img_7.png" alt="Img" /></p>

<p>
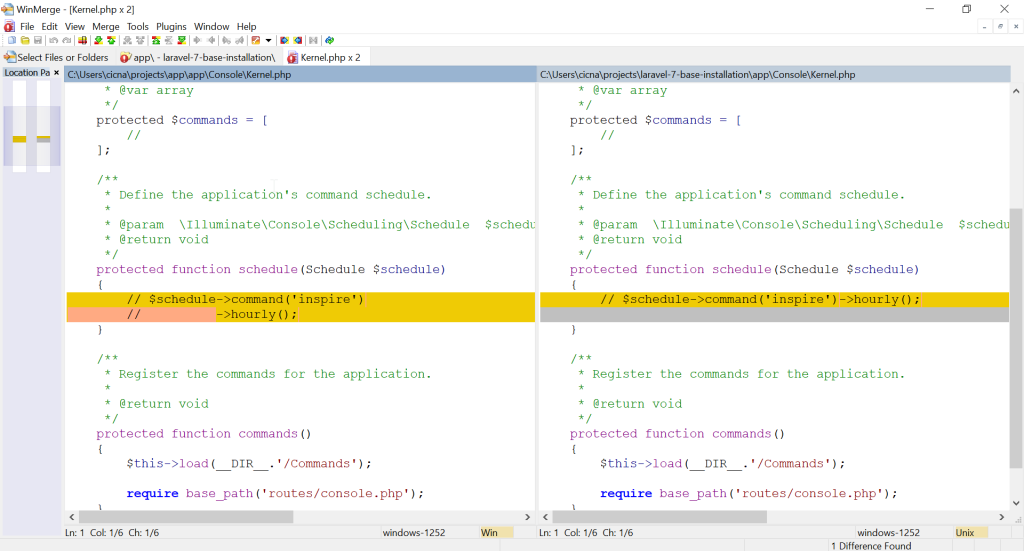
The only difference is in one comment. We can safely use the version from Laravel 7, since it is newer. To do this,
first we mark the difference and then click on the ‘Copy left’ button.</p>

<p><img src="/assets/images/posts/2020-04-18-my-laravel-upgrade-flow/img_8.png" alt="Img" /></p>

<p>This will bring the change from Laravel 7 app to the current app. When we save and refresh comparison results, we will
again see the Kernel.php file marked as ‘Identical’.</p>

<p>Next case, let’s check out Handler.php file.</p>

<p><img src="/assets/images/posts/2020-04-18-my-laravel-upgrade-flow/img_9.png" alt="Img" /></p>

<p><img src="/assets/images/posts/2020-04-18-my-laravel-upgrade-flow/img_10.png" alt="Img" /></p>

<p>
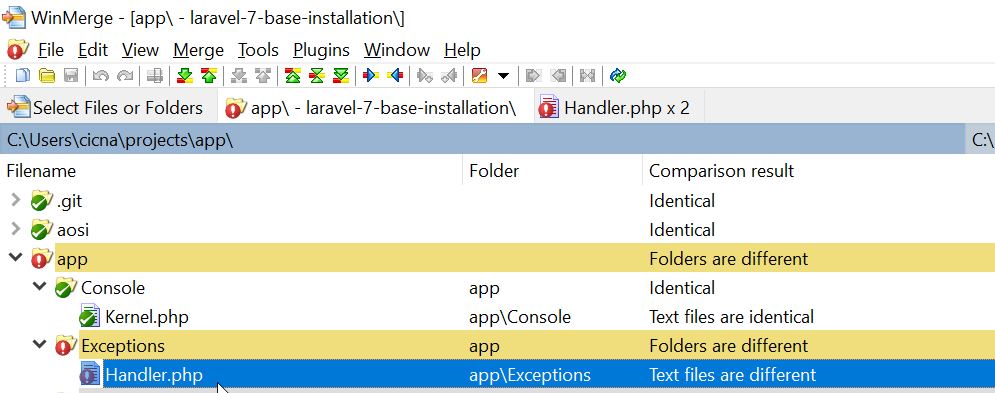
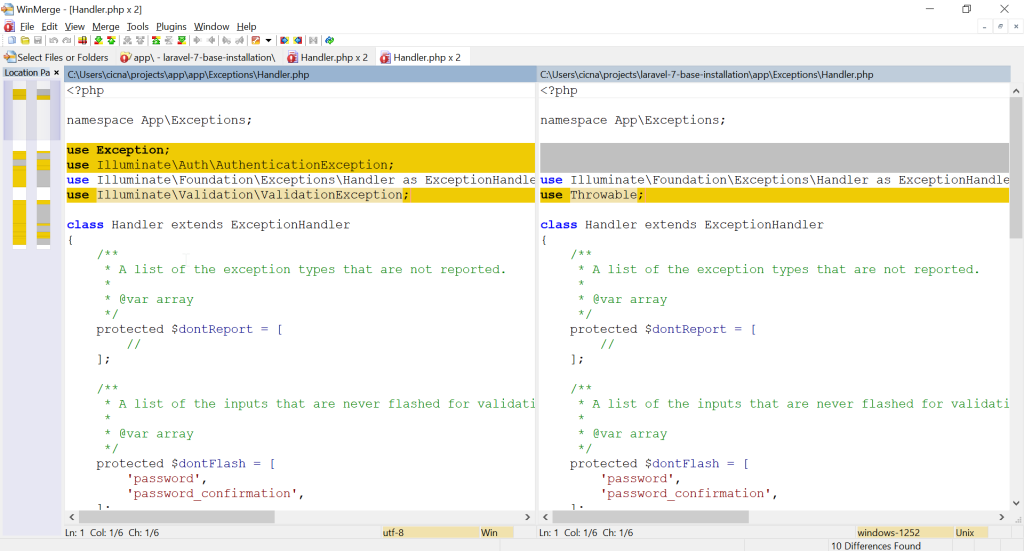
Right at the top we see a difference in the ‘use’ statements. The question now is which lines are our custom
modifications that we have made in the current app, and which changes are introduced in the Laravel 7 version.</p>

<p>
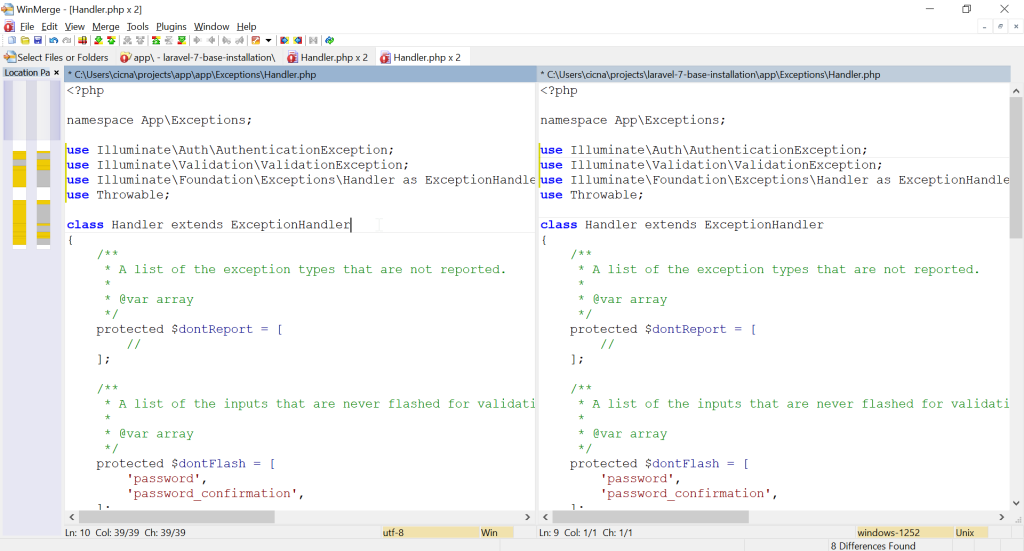
To check our custom modifications, we can compare current app with the Laravel 5.5 base installation. Let’s see a
comparison result for the Handler.php file in Laravel 5.5 base installation.</p>

<p><img src="/assets/images/posts/2020-04-18-my-laravel-upgrade-flow/img_11.png" alt="Img" /></p>

<p><img src="/assets/images/posts/2020-04-18-my-laravel-upgrade-flow/img_12.png" alt="Img" /></p>

<p>
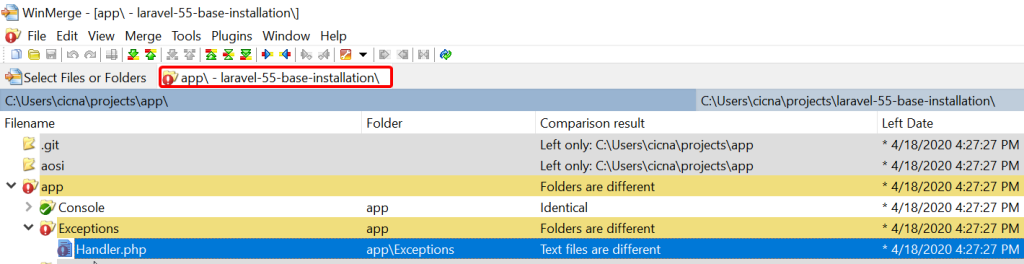
As we can see, our custom modification is that we have used ‘AuthenticationException’ and ‘ValidationException’, so we
know that those two lines must stay. Other lines correspond to the Laravel 5.5 base installation, so we can consider
changing them.</p>

<p>The sync procedure now is this. I copy right to the Laravel 7 app all custom code. I copy left to the current app all
newly introduced code if it doesn’t conflict with current code.</p>

<p>
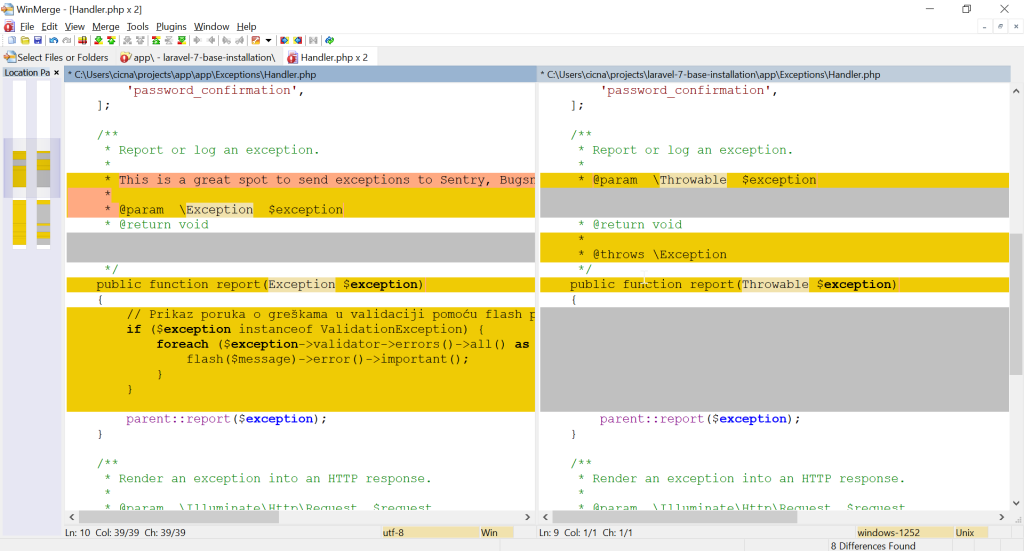
For example, in the new Laravel 7 app, it now has the line ‘use Throwable’ instead of ‘use Exception’. After a brief
look at the code, I see that the report() method signature is changed and that it now uses Throwable. The Exception
class is never used anymore in this file, so I can be sure to replace ‘use Exception’ with ‘use Throwable’. The result
for this difference would be this:</p>

<p><img src="/assets/images/posts/2020-04-18-my-laravel-upgrade-flow/img_13.png" alt="Img" /></p>

<p>Let’s move down and take a look at other difference in the same file. We have a method report() which now has a
different signature.</p>

<p><img src="/assets/images/posts/2020-04-18-my-laravel-upgrade-flow/img_14.png" alt="Img" /></p>

<p>As we mentioned, it now accepts Throwable parameter instead of Exception. Let’s take a look at the comparison with
Laravel 5.5 so we can be sure about our modifications that we have introduced in this file regarding this method.</p>

<p><img src="/assets/images/posts/2020-04-18-my-laravel-upgrade-flow/img_15.png" alt="Img" /></p>

<p>
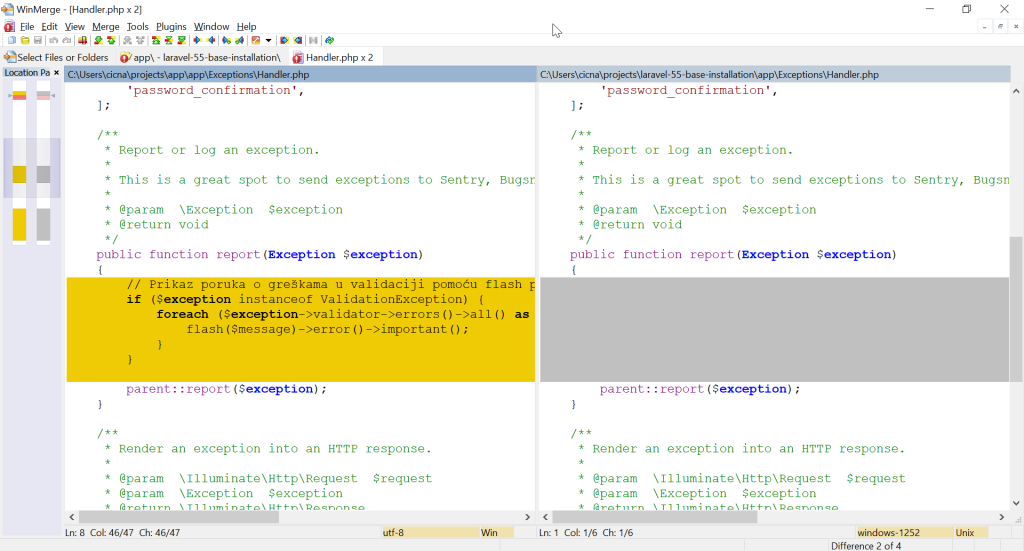
We can see that the only change is in the body of the method. This means that we have to take the new signature from
Laravel 7, and also use our custom code in the method. In this case, despite the new signature, the custom code will
still work, since Exception is Throwable. The result for this difference is:</p>

<p><img src="/assets/images/posts/2020-04-18-my-laravel-upgrade-flow/img_16.png" alt="Img" /></p>

<p>
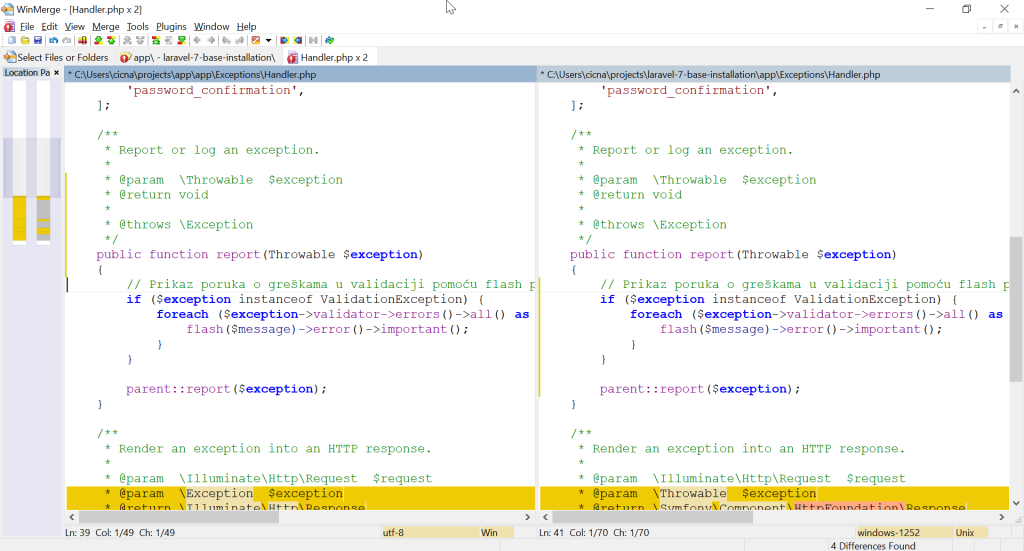
There are still some differences in this file, but to solve them the concept is the same as mentioned in the previous
example. Let’s take a look at the next case.</p>

<p><img src="/assets/images/posts/2020-04-18-my-laravel-upgrade-flow/img_17.png" alt="Img" /></p>

<p>The marked files (new config files) are only available in Laravel 7 app, so we can safely copy them to our current app
(copy left).</p>

<p>When it comes to cache files, it actually doesn’t matter which version we choose to keep, since those are generated
files.</p>

<p><img src="/assets/images/posts/2020-04-18-my-laravel-upgrade-flow/img_18.png" alt="Img" /></p>

<p>They will actually be cleared in the end of the procedure, so we can use left or right version just to have them in
sync, so they don’t get in our way.</p>

<h2 id="refreshing-composer-and-node-packages">Refreshing Composer and Node packages</h2>

<p>Regarding Composer, when it comes to ‘composer.json’ file, in essence you should replace all the packages with the
newer version from Laravel 7, and keep all the custom packages in your current app. File ‘composer.lock’ can be
deleted, as well as ‘vendor’ directory.</p>

<p>Similar thing is with the file ‘packages.json’ – use newer version packages, and keep custom packages. Directory
‘node_modules’ can be deleted.</p>

<p>After the configuration of composer.json and packages.json file, we can enter the following commands to refresh
all the newly included and kept packages. Commands are entered for current app:</p>

<div class="language-shell highlighter-rouge"><div class="highlight"><pre class="highlight"><code>composer <span class="nb">install
</span>npm <span class="nb">install</span>
</code></pre></div></div>

<p>File ‘composer.lock’ can now be copied right to the Laravel 7 app, just to have it in sync. Folders ‘vendor’ and
‘node_modules’ can be copied also, or the above-mentioned commands can be run in the Laravel 7 folder.</p>

<p>To clear all the auto generated files in Laravel, we can now enter the following command in the current app:</p>

<div class="language-shell highlighter-rouge"><div class="highlight"><pre class="highlight"><code>php artisan optimize:clear
</code></pre></div></div>

<p>We can also sync this with the Laravel 7, just to have it in sync.</p>

<p>At the end of the procedure of comparing current app with Laravel 7 app, we should have all the folders and files in
sync, like this.</p>

<p><img src="/assets/images/posts/2020-04-18-my-laravel-upgrade-flow/img_19.png" alt="Img" /></p>

<h2 id="check-laravel-upgrade-guides">Check Laravel upgrade guides</h2>

<p>Laravel documentation is good at covering all the changes a new version brings. When upgrading, we should
read all the upgrade guides from the version we are upgrading from to the version we are upgrading to.</p>

<p>For example, in our case, we have regularly used ‘str_’ helper functions which were available in Laravel
5.5 <a href="https://laravel.com/docs/5.5/helpers#available-methods">https://laravel.com/docs/5.5/helpers#available-methods</a>,
and which are now replaced with ‘Illuminate\Support\Str’
class <a href="https://laravel.com/docs/7.x/helpers#available-methods">https://laravel.com/docs/7.x/helpers#available-methods</a>.
This means we must search for all occurrences of
‘str_’ functions in our code and replace them with corresponding methods available in ‘Str’ class.</p>

<h2 id="php-version">PHP version</h2>

<p>If you didn’t already run your Laravel 5.5.* application on higher PHP version, upgrading from Laravel 5.5.* to
Laravel 7.* also means upgrading from PHP 7.0 to PHP 7.2 or higher. If this is the case, this means that we should
also check upgrade guides for PHP:</p>

<ul>
  <li><a href="https://www.php.net/manual/en/migration71.php">https://www.php.net/manual/en/migration71.php</a></li>
  <li><a href="https://www.php.net/manual/en/migration72.php">https://www.php.net/manual/en/migration72.php</a></li>
  <li><a href="https://www.php.net/manual/en/migration73.php">https://www.php.net/manual/en/migration73.php</a></li>
  <li><a href="https://www.php.net/manual/en/migration74.php">https://www.php.net/manual/en/migration74.php</a></li>
</ul>

<h2 id="save-production-state-and-git-commit-">Save production state and git commit 🙂</h2>
<p>When you have made sure that your app works, you can make your commit for the upgrade. When upgrading, I like to have
as few commits as possible, preferably only one 🙂 (as if everything works from single commit :P).</p>

<div class="language-shell highlighter-rouge"><div class="highlight"><pre class="highlight"><code>git commit <span class="nt">-m</span> <span class="s2">"Upgrade to Laravel 7"</span>
git push <span class="nt">-u</span> origin laravel-7-upgrade
</code></pre></div></div>

<p>If you remember, we are on a new branch used for upgrade only. We still have our production state available on the
‘master’ branch. Let’s just keep current production state in a new branch, so we have it available for quick checkout.</p>

<div class="language-shell highlighter-rouge"><div class="highlight"><pre class="highlight"><code>git checkout master
git checkout <span class="nt">-b</span> pre-laravel-7-upgrade
git checkout master
</code></pre></div></div>

<p>At this point, since everything works, we can merge the upgrade branch with master and push it to repository.</p>

<div class="language-shell highlighter-rouge"><div class="highlight"><pre class="highlight"><code>git merge laravel-7-upgrade
git push
</code></pre></div></div>]]></content><author><name>cicnavi</name></author><category term="Programming" /><summary type="html"><![CDATA[If you work with Laravel PHP framework like me, you have surely done an upgrade to a newer version of Laravel. In this article I want to share an upgrade workflow that I usually do when I upgrade some Laravel app.]]></summary></entry></feed>